 A Proud Canadian Company
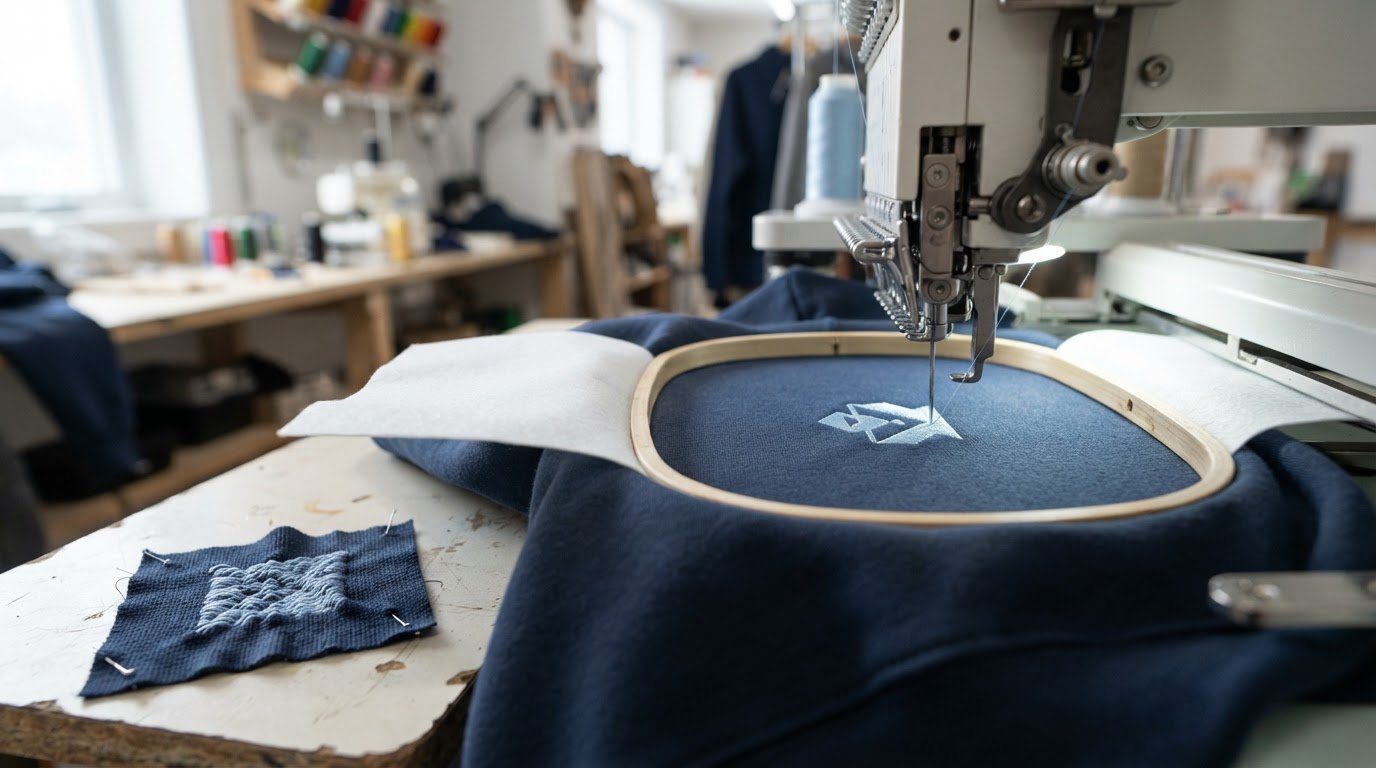
Hooping a knit more tightly can make puckering worse, not better. If you’re wondering why your embroidery is puckering, the cause is often a mismatch between the fabric’s stretch, the design’s density and the support underneath, rather than an obvious machine fault.
Ripples, gathered areas and fabric that looks stretched around the stitching can all indicate puckering, but they may have different causes. Knits can shift or stretch during embroidery, while a dense design can pull fabric inward. The pattern helps narrow down what needs to change.
This guide explains what embroidery puckering is, how to recognize common types and causes, and how stabilization can help keep knits smooth. Stabilizer is a backing that supports fabric as the machine stitches. You’ll learn how backing, hooping and design choices affect the result, and what a professional considers when preparing knit garments for embroidery. A stable foundation helps produce cleaner, more even stitching.
Key Takeaways
- Learn to distinguish bunching, stretching and density puckers so you can better understand what may be affecting the embroidery.
- See how fabric type, weight and stretch guide a professional’s choice of stabilizer.
- Find out how knit garments can be supported during embroidery without stretching them out of shape.
- Explore how design density, hooping and thread tension can contribute to puckering.
- Discover why matching the design and stabilizing approach to the fabric helps create a smoother finish.
What Is Embroidery Puckering?
Embroidery puckering is a ripple or gather caused when stitching pulls fabric out of shape. After machine embroidery, a professional may sometimes ease puckering by wetting and gently stretching the fabric, then letting it dry flat and taut.
- Match the stabilizer to the fabric. Stabilizer supports fabric while stitches are formed. A professional considers the fabric’s weight and stretch, along with the design’s density, before choosing one. Lightweight fabric needs support without becoming difficult to stitch. At least one layer of tear-away stabilizer is recommended for lightweight materials, and two layers are often used. After stitching, gently tear away the backing.
- Give lightweight fabric more body. Thin fabric can shift beneath dense stitches, so a professional may apply heavy starch before hooping. Temporary adhesive can hold stabilizer layers against the fabric and reduce movement. The aim is to support the cloth, not pull it tight. A small, sharp embroidery needle suits light cotton broadcloth, which should not be overstretched in the hoop.
- Choose fabric that can support the design. Preshrunk, washable, good-quality cotton or linen can provide a stable base for embroidery. Preshrinking the fabric before stitching helps reduce changes in its size around the design after washing. A professional can test fabric choices with mini testers, small sample embroideries that show how the material responds to the design and stitches.
- Build a stable foundation with underlay. Underlay is the first set of stitches beneath the visible design. Suitable underlay helps hold the fabric steady before dense top stitches are added. During digitizing, the process of converting artwork into stitch instructions, a professional can tailor the underlay to the fabric. Without a suitable foundation, a dense design may contract the fabric between stitched areas and create visible ripples.
- Address puckering after stitching carefully. For washable embroidery, a professional may soak the fabric in lukewarm water, adding soap if marks need attention. The damp fabric can then be stretched gently and clipped or pinned in shape to dry. Leaving it stretched overnight can help it retain its shape. To finish the same day, the professional may iron and mount or frame it while it is slightly damp.
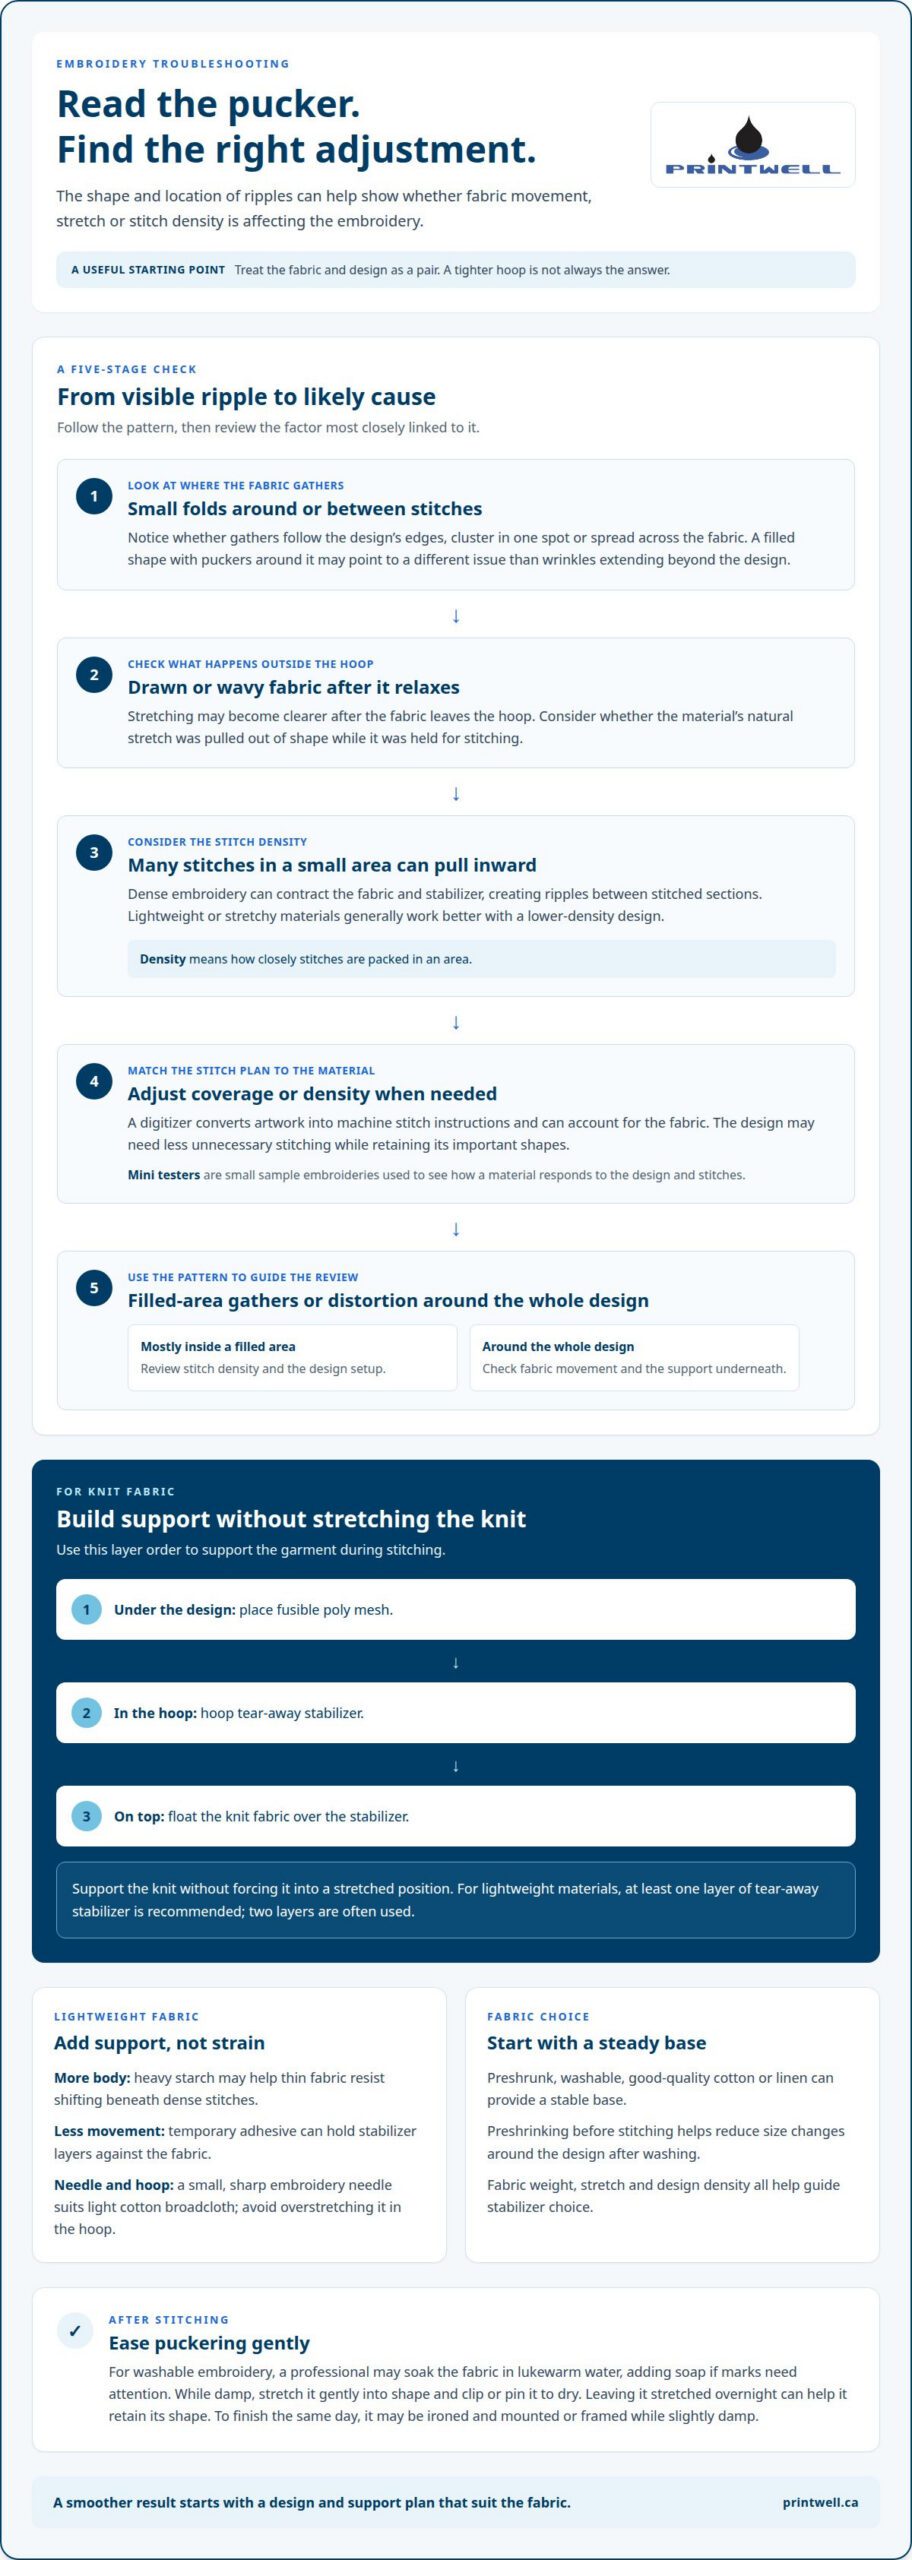
For knit fabrics, place fusible poly mesh under the design, hoop tear-away stabilizer, and float the knit fabric on top. Choose 100% cotton or linen.
Bunching, stretching, and density puckers
- Identify bunching by where the fabric gathers. Bunching often appears as small folds around or between stitched areas. A professional checks whether the gathers follow the design’s edges, cluster in one spot or spread across the fabric. That pattern helps distinguish a design pulling the material from fabric that shifted during stitching. For example, puckers concentrated around a filled shape suggest a different issue from wrinkles extending beyond the design.
- Look for signs of stretching. A stretched pucker may become clearer after the fabric leaves the hoop and relaxes. The material can look drawn or wavy around the embroidery, even if it appeared smooth while secured. A professional considers how the fabric was held during stitching and whether its natural stretch was pulled out of shape. Knits and other stretchy materials need support without being forced into a stretched position.
- Assess whether the design is too dense for the fabric. Dense embroidery packs many stitches into a small area. Those stitches can contract the fabric and stabilizer, creating ripples between stitched sections. Lightweight or stretchy fabrics generally work better with lower-density designs. A broad, heavily filled motif may therefore need a less dense stitch plan than a smaller, simpler design on the same garment.
- Match the artwork and stitch plan to the material. A professional digitizer, who converts artwork into machine stitch instructions, can account for the fabric being embroidered. This includes adjusting the design if its coverage or density could overwhelm the material. The aim is to preserve important shapes while reducing unnecessary stitching. Detailed artwork on a soft knit, for instance, may need a lighter stitch plan than the same design on stable woven fabric.
- Use the pucker pattern to guide corrections. If a sample bunches mainly inside a filled area, a professional can review the stitch density and digitizing. If distortion appears around the whole design, they can examine fabric movement and support. Lower-density designs generally work better on lightweight and stretchy fabrics. Matching the design to the garment helps reduce pulling while keeping the embroidery clear and balanced.
Treat fabric and design as a pair when deciding whether a stitch plan needs adjustment. If the material looks strained or the stitched area gathers, consider whether the design’s density suits the fabric. Reducing density where needed can bring the design and material into better balance. The aim is not simply to remove stitches, but to choose coverage that suits the fabric while retaining the design’s important shapes.
Stabilising and embroidering knits
- Assess the garment before stitching. A professional checks the knit’s stretch, thickness and construction, including ribbed cuffs or seams near the design. These details affect how the fabric moves beneath the needle. A soft hoodie panel, for example, needs steady support while retaining its natural shape. Placement matters too: stitching across a seam can create uneven thickness beneath the embroidery.
- Choose backing that supports stretch. Cut-away stabilizer is generally more stable than tear-away backing, making it useful for knits and other stretchy garments. It remains behind the stitches after embroidery, helping support the design through wear and washing. A professional chooses backing to suit the fabric and design rather than using the same stabilizer for every garment.
- Prepare fusible poly mesh before use. Fusible poly mesh is a soft, iron-on backing that can support knit fabric beneath the design. It can shrink, so a professional washes and dries it before embroidery to help reduce later movement in the backing. Fusible interlining, another backing layer, can also help keep the fabric evenly taut during stitching.
- Support the knit without stretching it. One method is to place fusible poly mesh beneath the design, hoop tear-away stabilizer, then float the knit on top. “Floating” means the garment sits above the hoop instead of being clamped inside it. This can help avoid hoop marks and excess stretching. The professional keeps the knit smooth and relaxed while positioning it over the stabilizer.
- Use a needle suited to knit fabric. A stretch needle is recommended for knits because its point pushes fabric fibres aside instead of breaking them. This can help prevent fibre damage and skipped stitches. A professional also keeps the garment from shifting as the needle moves. A small amount of temporary fabric adhesive can help hold slippery or stretchy cloth in place during embroidery.
- Secure garment layers and test the setup. A cut-away layer on the back can help hold both sides of a slippery garment in place while hooping. This matters for a hoodie or jacket, where an unsecured inner layer could shift beneath the outer panel. Before stitching the finished piece, a professional can assess how the selected backing, needle and stitch design work together on the knit.
Common causes of embroidery puckering
Check the hoop, needle and finished fabric in sequence. Each can point to a different cause, from fabric distortion during stitching to changes after washing.
How professionals hoop fabric
A professional places fabric smoothly in a neutral position instead of stretching it to fit the hoop. Pulling cloth tight can distort it; once released, it may relax and pucker around the stitches. Lycra or similar fabric designed to stretch across the body is an exception. For slippery satin or nylon, hooping the fabric instead of floating it can limit shifting.
A professional also positions the hoop close to the design. This gives the stitched area more support. The fabric should sit evenly, without wrinkles or excess tension, and the hoop should hold it securely without distorting its natural shape. If the cloth slips or shifts, puckering can follow even when the design is suitable.
How professionals select the needle size and type
A professional matches needle size and type to the fabric, thread and design. A needle that is too large can leave noticeable holes, while one that is too small may flex or struggle to penetrate. Either issue can disturb the fabric as stitches form. The right choice is the finest needle that passes through without damaging the fabric or thread or bending.
For stretchy knits, a stretch needle pushes fibres aside rather than breaking them. Light cotton broadcloth needs a different approach: it should not be overstretched, and a small, very sharp embroidery needle is recommended. A dull needle can snag and bunch slippery fabric. Needle type affects both how it passes through the material and how smoothly the fabric moves.
How professionals check washing and stabilizer removal
Washing doesn’t automatically cause puckering, but fabric shrinkage after stitching can draw the embroidered area out of shape. A professional considers whether the fabric was preshrunk and how it should be washed. Polyester embroidery thread may also try to return to its relaxed state over the 24 hours after sewing and hoop removal, potentially creating puckers.
Removing stabilizer can reveal distortion if the fabric no longer has enough support, but careful removal matters too. Tear-away backing should be pulled gently, not yanked against the stitches. Cut-away backing stays behind the design and helps support stretchy fabric. If puckering appears after washing or backing removal, a professional can examine the fabric, stitch tension and remaining support to identify the likely cause.
How should a professional hoop fabric to prevent puckering?
A professional hoops fabric smoothly in a neutral position, then checks its support and placement before stitching. The aim is to hold the material steady without stretching it out of shape.
- Position the fabric without pulling it taut. The professional smooths the material before securing it, keeping it relaxed rather than stretched in the hoop. Pulling fabric tight can distort it; once released, it may relax and pucker around the stitches. Lycra and similar fabrics are exceptions when the garment is intended to stretch across the body while worn.
- Keep the design close to the hoop sides. A hoop placed near the embroidery gives the stitched area more support. The professional chooses a hoop that holds the fabric securely while keeping the design within its working area. For a small chest motif, for example, placing the hoop close to it can help steady the cloth during stitching.
- Choose hooping or floating for the fabric. With slippery satin or nylon, hooping the fabric itself can help prevent it from sliding and puckering. Floating means laying fabric over a hooped stabilizer instead of clamping it inside the hoop. A professional chooses between these methods based on how the material moves and the support the design needs.
- Check the fabric’s position before stitching. The professional checks that the material lies flat, with no folds caught beneath the hoop. On a garment, the inner layer must also stay clear of the stitching area unless it is meant to be embroidered. A shifted layer can create uneven tension or unwanted stitches through both sides of a hoodie or jacket.
- Use the stabilizer to support the hooping method. Lightweight or stretchy fabric may need backing to stay steady as stitches form. The professional aligns the fabric and stabilizer, then checks that the hoop holds both without stretching the cloth. For a slippery garment, cut-away backing can help hold both fabric layers in place while hooping.
- Recheck the fabric during longer stitching work. If embroidery pauses, removing the fabric from the hoop after each day’s stitching session can help prevent puckering. Before stitching resumes, the professional positions the material smoothly again instead of forcing it into a stretched shape. This helps the fabric stay in a more natural position as the design is completed.
For professionally prepared embroidered event badges, the hooping approach is matched to the material and design.
Printwell Canada
Printwell Canada offers embroidered hoodies and jackets for personal, team and business apparel. If puckering has you unsure about a knit garment, the factors in this guide explain how fabric stretch, design density and stabilizing choices affect the finished look.
For custom embroidery, the garment and design need to work well together. Share the item you have in mind and the look you want, such as a clear logo or a simple stitched detail. Printwell Canada can help with embroidered apparel, including hoodies and jackets, to take your idea from concept to finished garment.
Contact Printwell Canada to discuss your custom embroidery project.
Plan your next embroidered piece with confidence
If you’re still wondering why your embroidery is puckering, consider the garment and the finished look you want as one project. A clear logo, a small chest detail or a larger design can call for different placement and stitching choices. Sharing your garment type and design goals gives the embroidery team a useful starting point.
Printwell Canada offers embroidered hoodies alongside custom T-shirts and direct-to-film (DTF) stickers and films. Direct-to-film is a printing process that transfers a design from film onto fabric, giving you options to suit your idea. Whether you’re preparing apparel for a group, business or personal project, discussing the design can help shape the next step and set clear expectations for the result.
Contact Printwell Canada about embroidery to discuss the garment and design you have in mind. Your next custom piece can start with a thoughtful plan and a clear direction.
Frequently Asked Questions
Which Fabrics Are Most Likely To Pucker?
Stretchy knits, lightweight fabrics and slippery materials such as satin and nylon are more prone to puckering. If you’re wondering why your embroidery is puckering, fabric movement beneath the stitches may be part of the answer. Knit fabric can shift or stretch, while satin and nylon may slide against their backing. A professional considers the fabric’s weight, surface and stretch, since the same design may behave differently on a hoodie knit than on woven cotton.
What causes embroidery fabric to pucker?
Insufficient stabilization is a common cause, but tight hooping, dense stitching, unsuitable thread tension or poorly digitized artwork can also contribute. Digitizing means converting artwork into instructions a machine follows to sew the design. These factors can combine: a tightly hooped knit carrying a dense logo may pull in more than one direction. Where ripples form can help identify the cause, such as puckering inside a filled shape versus distortion across the garment.
How do stabilizer type and weight affect embroidery puckering?
A stabilizer is backing that supports fabric while stitches are made. Lightweight fabric generally needs at least one layer of tear-away stabilizer, and two layers are often used. Stretchy knits usually need cut-away backing, which remains behind the embroidery after stitching. If the backing is too light for a demanding design, the fabric can move. A setup that is too stiff may affect how the finished garment hangs.
How do thread tension and bobbin tension cause puckering?
Thread tension describes how tightly the machine pulls the upper thread through the fabric. If it’s too tight, stitches can draw fabric inward and distort it. Bobbin tension is the pull on the lower thread from the bobbin, the small spool beneath the needle plate. Excessive pull there can also contribute to puckering. Professionals assess stitch formation and make gradual changes rather than large adjustments that could create new problems.
Can embroidery design density or stitch count cause puckering?
Yes. Closely packed stitches can contract fabric, particularly on a lightweight knit. Stitch count alone doesn’t tell the whole story; the size and placement of filled areas also affect how strongly a design pulls. A digitizer can reduce stitch density or adjust the machine instructions to suit the garment. For a small logo on a soft shirt, a simpler, lighter design may lie flatter.
How can a professional prevent puckering when embroidering stretchy or lightweight fabric?
A professional matches the design, backing and needle to the garment, then supports the material without stretching it out of shape. For knits, a stretch needle can push fibres aside rather than break them. Lightweight fabric may need added support, while slippery cloth can be secured to prevent movement. A sample stitch-out, a test embroidery made before the finished piece, helps assess how the fabric and design work together.
Which embroidery stabilizer should a professional use for different fabrics?
For lightweight fabric, a professional may choose tear-away stabilizer, using at least one layer and often two. For a knit or another stretchy garment, cut-away backing provides lasting support because it remains behind the design. Fusible poly mesh, a soft backing attached with heat, can sit beneath a knit design. A professional may hoop tear-away backing and place the garment over it without clamping the garment inside the hoop.